Title:
UCSF NURSING INFORMATICS SPECIALIST SELECTED FOR LEADERSHIP PROGRAM
Document Type:
Brief article
Full Text:
SAN FRANCISCO, CA -- The following information was released by
UCSF Medical Center:
Sandra Ng, a nurse specialist and manager of Nursing Informatics
at UCSF Medical Center, is one of two nurses nationwide selected by the
Alliance for Nursing Informatics (ANI) to participate in an emerging leaders
program. The ANI's Nursing Informatics Emerging Leaders Program is
jointly supported by the American Medical Informatics Association (AMIA) and
the Healthcare Information and Management Systems Society (HIMSS).
The inaugural program was created to develop leaders capable of
assuming national leadership positions in an informatics-related
organization.
At UCSF, Ng is responsible for operating trials, or pilot
projects, to test new hardware and applications in a clinical setting,
redesigning processes and evaluating the impact of these innovations on
workflows during routine patient care. During her two-year leadership
program, Ng will be mentored by Joyce Sensmeier, HIMSS vice president of
informatics, and Curtis Dikes, national director of clinical informatics
technology integration at Kaiser Permanente.
Ng was selected based on a number of criteria, including having
leadership skills in an informatics-related organization and serving in a
mid-level position in health care informatics.
Sheila Antrum, chief nursing officer at UCSF Medical Center, said,
"I have seen first hand the benefits of a nursing informatics team at
UCSF. The most profound innovations are related to nursing practice,
interdisciplinary care planning and medication management."
Ellen Makar, clinical coordinator in decision support at the
Yale-New Haven Health System in Connecticut, also was selected for the
program.
ANI is co-sponsored by AMIA and HIMSS to represent nursing
informatics and provide a structure to advance of efforts of nursing
informatics professionals in improving delivery of patient care. For more
information, visit www.allianceni.org.
AMIA is a member-supported professional association of leaders
advancing biomedical and health informatics in the United States and HIMSS is
a membership organization focused on providing global leadership for the
optimal use of healthcare information technology and management systems.
Source Citation
"UCSF NURSING INFORMATICS SPECIALIST SELECTED FOR LEADERSHIP PROGRAM." States News Service 12 Jan. 2010. Academic OneFile. Web. 4 May 2012.
Document URL
http://go.galegroup.com/ps/i.do?id=GALE%7CA216351305&v=2.1&u=phspuqc&it=r&p=AONE&sw=w
Gale Document Number:
GALE|A216351305
Insights:
This article is about, UCSF nursing infromatics who are selected for the leadership program. The one whoa re selected as by criteria like they must have a background in the informatics-related organization and has a postion or know a lot about the health care infomatics. I think that having a leadership training like this is very essencial especially being a nursing informatics because they give knew infomation and your knowledge can be widen. And also its a way to improve the delivery of patient care. Leadership in nursing informatics can really make a big difference in the hospital especially when it comes to data, information, and the use of technology. That is why i salude the people who are really into this kind of field. because it takes a lot of effort in time to do such job.
a. Before removing the container from the drawer or shelf
b. As the amount of medication ordered is removed from the container
c. Before returning the container to the storage
2.
Right Dose –when performing medication calculation or conversions, the nurse should have another qualified nurse check the calculated
dose
3.
Right Client – an important step in administering medication safely is being sure the medication is given to the right client.
a. To identify the client correctly:
b.
The nurse checks the medication administration form against the
client’s identification bracelet and asks the client to state his or her name to ensure the client’s identification bracelet has the correct information.
4.
Right Route
– if a prescriber’s order neither does nor designates a route of
administration, the nurse consult the prescriber. Likewise, if
the specified route is not recommended, the nurse should alert the prescriber immediately.
5.
Right Time
a.
The nurse must know why a medication is ordered for certain times
of the day and whether the time schedule can be altered
b. Each institution has are commended time schedule for medications ordered at frequent interval
c.
Medication that must act at certain times are given priority (e.g
insulin should be given at a precise interval before a meal)
6.
RIGHT DOCUMENTATION –Documentation is an important part of safe medication administration
a.
The documentation for the medication should clearly reflect the
client’s name, the name of the ordered medication, the time, dose, route and frequency
b. Sign medication sheet immediately after administration of the drug
Client’s Right Related to Medication Administration
A client has the following rights:
- To be informed of the medication’s name, purpose, action, and potential undesired effects.
- To refuse a medication regardless of the consequences
- To have a qualified nurses or physicians assess medication history, including allergies
- To be properly advised of the experimental nature of medication therapy and to give written consent for its use
- To received labeled medications safely without discomfort in accordance with the six rights of medication administration
- To receive appropriate supportive therapy in relation to medication therapy
- To not receive unnecessary medications
II. Practice Asepsis
- Wash hand before and after preparing the medication to reduce transfer of microorganisms.
III. Nurse who administers the medications is responsible for their own action
- Question any order that you considered incorrect (may be unclear or appropriate)
IV. Be knowledgeable about the medication that you administer
- A fundamental rule of safe drug administration is: “Never administer an unfamiliar medication”
V. Keep the Narcotics in locked place
VI. Use only medications that are in clearly labeled containers. Relabeling of drugs is the responsibility of the pharmacist.
VII. Return liquid that is cloudy in color to the pharmacy.
VIII. Before administering medication, identify the client correctly
IX. Do not leave the medication at the bedside. Stay with the client until he actually takes the medications.
X. The nurse who prepares the drug administers it. Only the nurse prepares the drug knows what the drug is. Do not accept endorsement of medication.
XI. If the client vomits after taking the medication, report this to the nurse in charge or physician.
XII. Preoperative medications are usually discontinued during the postoperative period unless ordered to be continued.
XIII. When a medication is omitted for any reason, record the fact together with the reason.
XIV. When the medication error is made, report it immediately to the nurse in charge or physician
- To implement necessary measures immediately. This may prevent any adverse effects of the drug.
Oral Administration
Advantages
- The easiest and most desirable way to administer medication
- Most convenient
- Safe, does nor break skin barrier
- Usually less expensive
Disadvantages
- Inappropriate if client cannot swallow and if GIT has reduced motility
- Inappropriate for client with nausea and vomiting
- Drug may have unpleasant taste
- Drug may discolor the teeth
- Drug may irritate the gastric mucosa
- Drug may be aspirated by seriously ill patient.
Drug Forms for Oral Administration
- Solid- tablet, capsule, pill, powder
- Liquid- syrup, suspension, emulsion, elixir, milk, or other alkaline substances.
- Syrup- sugar-based liquid medication
- Suspension- water-based liquid medication. Shake bottle before use of medication to properly mix it.
- Emulsion- oil-based liquid medication
- Elixir- alcohol-based
liquid medication. After administration of elixir, allow 30 minutes to
elapse before giving water. This allows maximum absorption of the
medication.
“Never crush Enteric-Coated or Sustained Release Tablet”
- Crushing enteric-c-coated tablets –
allows the irrigating medication to come in contact with the oral or
gastric mucosa, resulting in mucositis or gastric irritation.
- Crushing sustained-released medication –
allows all the medication to be absorbed at the same time, resulting in
a higher than expected initial level of medication and a shorter than
expected duration of action
Sublingual Administration
- A drug that is placed under the tongue, where it dissolves.
- When
the medication is in capsule and ordered sublingually, the fluid must
be aspirated from the capsule and placed under the tongue.
- A medication given by the sublingual route should not be swallowed, or desire effects will not be achieved
Advantages
- Same as oral
- Drug is rapidly absorbed in the bloodstream
Disadvantages
- If swallowed, drug may be inactivated by gastric juices.
- Drug must remain under the tongue until dissolved and absorbed
Buccal Administration
- A medication is held in the mouth against the mucous membranes of the cheek until the drug dissolves.
- The
medication should not be chewed, swallowed, or placed under the tongue
(e.g sustained release nitroglycerine, opiates, antiemetic,
tranquilizer, sedatives)
- Client should be taught to alternate the cheeks with each subsequent dose to avoid mucosal irritation
Advantages
- Same as oral
- Drug can be administered for local effect
- Ensures greater potency because drug directly enters the blood and bypass the liver
Disadvantages
- If swallowed, drug may be inactivated by gastric juice
Topical Administration
- Application of medication to a circumscribed area of the body.
1.
Dermatologic – includes lotions, liniment and ointments, powder.
a.
Before application, clean the skin thoroughly by washing the area
gently with soap and water, soaking an involved site, or locally debriding tissue.
b. Use surgical asepsis when open wound is present
c. Remove previous application before the next application
d. Use gloves when applying the medication over a large surface. (e.g. large area of burns)
e. Apply only thin layer of medication to prevent systemic absorption.
2.
Ophthalmic - includes instillation and irrigation
a. Instillation – to provide an eye medication that the client requires.
b. Irrigation – To clear the eye of noxious or other foreign materials.
c. Position the client either sitting or lying.
d. Use sterile technique
e.
Clean the eyelid and eyelashes with sterile cotton balls moistened
with sterile normal saline from the inner to the outer canthus
f. Instill eye drops into lower conjunctival sac.
g.
Instill a maximum of 2 drops at a time. Wait for 5 minutes if
additional drops need to be administered. This is for proper absorption
of the medication.
h. Avoid dropping a solution onto the cornea directly, because it causes discomfort.
i. Instruct the client to close the eyes gently. Shutting the eyes tightly causes spillage of the medication.
j.
For liquid eye medication, press firmly on the nasolacrimal duct
(inner cantus) for at least 30 seconds to prevent systemic absorption of
the medication.
3.
Otic Instillation – to remove cerumen or pus or to remove foreign body
a.
Warm the solution at room temperature or body temperature, failure
to do so may cause vertigo, dizziness, nausea and pain.
b. Have the client assume a side-lying position (if not contraindicated) with ear to be treated facing up.
c. Perform hand hygiene. Apply gloves if drainage is present.
d. Straighten the ear canal:
- 0-3 years old: pull the pinna downward and backward
- Older than 3 years old: pull the pinna upward and backward
e.
Instill eardrops on the side of the auditory canal to allow the
drops to flow in and continue to adjust to body temperature
f. Press gently bur firmly a few times on the tragus of the ear to assist the flow of medication into the ear canal.
g. Ask the client to remain in side lying position for about 5 minutes
h.
At times the MD will order insertion of cotton puff into outermost
part of the canal. Do not press cotton into the canal. Remove cotton after 15 minutes.
4.
Nasal –
Nasal instillations usually are instilled for their astringent effects
(to shrink swollen mucous membrane), to loosen secretions and
facilitate drainage or to treat infections of the nasal cavity or sinuses. Decongestants, steroids, calcitonin.
a. Have the client blow the nose prior to nasal instillation
b. Assume a back lying position, or sit up and lean head back.
c.
Elevate the nares slightly by pressing the thumb against the
client’s tip of the nose. While the client inhales, squeeze the bottle.
d. Keep head tilted backward for 5 minutes after instillation of nasal drops.
e. When the medication is used on a daily basis, alternate nares to prevent irritations
5.
Inhalation – use of nebulizer, metered-dose inhaler
a.
Semi or high-fowler’s position or standing position. To enhance
full chest expansion allowing deeper inhalation of the medication
b. Shake the canister several times. To mix the medication and ensure uniform dosage delivery
c.
Position the mouthpiece 1 to 2 inches from the client’s open mouth.
As the client starts inhaling, press the canister down to release one dose of the medication. This allows delivery of the medication more accurately into the bronchial tree rather than being trapped in the oropharynx then swallowed
d. Instruct the client to hold breath for 10 seconds to enhance complete absorption of the medication.
e.
If bronchodilator, administer a maximum of 2 puffs, for at least 30
second interval. Administer bronchodilator before other inhaled medication. This opens airway and promotes greater absorption of the medication.
f. Wait at least 1 minute before administration of the second dose or inhalation of a different medication by MDI
g. Instruct client to rinse mouth, if steroid had been administered. This is to prevent fungal infection.
6.
Vaginal – drug forms: tablet liquid (douches), jelly, foam and suppository.
a. Close room or curtain to provide privacy.
b.
Assist client to lie in dorsal recumbent position to provide easy
access and good exposure of vaginal canal, also allows suppository to dissolve without escaping through orifice.
c. Use applicator or sterile gloves for vaginal administration of medications.
- Vaginal Irrigation – is the washing of the vagina by a liquid at low pressure. It is also called douche.
i. Empty the bladder before the procedure
ii. Position
the client on her back with the hips higher than the shoulder (use
bedpan)
iii. Irrigating container should be 30 cm (12 inches) above
iv. Ask the
client to remain in bed for 5-10 minute following administration of
vaginal suppository, cream, foam, jelly or irrigation
Rectal Administration
- Can be use when the drug has objectionable taste or odor.
- Need to be refrigerated so as not to soften.
- Apply disposable gloves.
- Have the client lie on left side and ask to take slow deep breaths through mouth and relax anal sphincter.
- Retract
buttocks gently through the anus, past internal sphincter and against
rectal wall, 10 cm (4 inches) in adults, 5 cm (2 in) in children and
infants. May need to apply gentle pressure to hold buttocks together
momentarily.
- Discard gloves to proper receptacle and perform hand washing.
- Client must remain on side for 20 minute after insertion to promote adequate absorption of the medication.
Parenteral Administration
- Administration of medication by needle.
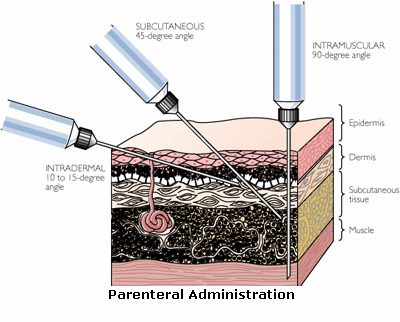 Intradermal
 – under the epidermis.
- The site are the inner lower arm, upper chest and back, and beneath the scapula.
;) Indicated for allergy and tuberculin testing and for vaccinations.
Indicated for allergy and tuberculin testing and for vaccinations. - Use the needle gauge 25, 26, 27: needle length 3/8”, 5/8” or ½”
- Needle at 10–15 degree angle; bevel up.
- Inject a small amount of drug slowly over 3 to 5 seconds to form a wheal or bleb.
- Do
not massage the site of injection. To prevent irritation of the site,
and to prevent absorption of the drug into the subcutaneous.
Subcutaneous- Vaccines, heparin, preoperative medication, insulin, narcotics.
Sites:
- outer aspect of the upper arms
- anterior aspect of the thighs
- Abdomen
- Scapular areas of the upper back
- Ventrogluteal
- Dorsogluteal
- Only small doses of medication should be injected via SC route.
- Rotate site of injection to minimize tissue damage.
- Needle length and gauge are the same as for ID injections
- Use 5/8 needle for adults when the injection is to administer at 45 degree angle; ½ is use at a 90 degree angle.
- For thin patients: 45 degree angle of needle
- For obese patient: 90 degree angle of needle
- For heparin injection: do not aspirate.
- Do not massage the injection site to prevent hematoma formation
- For insulin injection: Do not massage to prevent rapid absorption which may result to hypoglycemic reaction.
- Always
inject insulin at 90 degrees angle to administer the medication in the
pocket between the subcutaneous and muscle layer. Adjust the length of
the needle depending on the size of the client.
- For other
medications, aspirate before injection of medication to check if the
blood vessel had been hit. If blood appears on pulling back of the
plunger of the syringe, remove the needle and discard the medication and
equipment.
Intramuscular
- Needle length is 1”, 1 ½”, 2” to reach the muscle layer
- Clean the injection site with alcoholized cotton ball to reduce microorganisms in the area.
- Inject the medication slowly to allow the tissue to accommodate volume.
Sites: 1.
Ventrogluteal site
a.
The area contains no large nerves, or blood vessels and less fat.
It is farther from the rectal area, so it less contaminated.
b. Position the client in prone or side-lying.
c. When in prone position, curl the toes inward.
d.
When side-lying position, flex the knee and hip. These ensure
relaxation of gluteus muscles and minimize discomfort during injection.
e.
To locate the site, place the heel of the hand over the greater
trochanter, point the index finger toward the anterior superior iliac spine,
and then abduct the middle (third) finger. The triangle formed by the
index finger, the third finger and the crest of the ilium is the site.
2.
Dorsogluteal site
a. Position the client similar to the ventrogluteal site
b. The site should not be use in infant under 3 years because the gluteal muscles are not well developed yet.
c. To locate the site, the nurse draw an imaginary line from the greater
d. trochanter to the posterior superior iliac spine. The injection site id lateral and superior to this line.
e.
Another method of locating this site is to imaginary divide the
buttock into four quadrants. The upper most quadrant is the site of injection. Palpate the crest of the ilium to ensure that the site is high enough.
f. Avoid hitting the sciatic nerve, major blood vessel or bone by locating the site properly.
3.
Vastus Lateralis
a. Recommended site of injection for infant
b. Located at the middle third of the anterior lateral aspect of the thigh.
c. Assume back-lying or sitting position.
4.
Rectus femoris site –located at the middle third, anterior aspect of thigh.
5.
Deltoid site
a.
Not used often for IM injection because it is relatively small
muscle and is very close to the radial nerve and radial artery.
b.
To locate the site, palpate the lower edge of the acromion process and
the midpoint on the lateral aspect of the arm that is in line with the axilla. This is approximately 5 cm (2 in) or 2 to 3 fingerbreadths below the acromion process.
* IM injection – Z tract injection
a. Used for parenteral iron preparation. To seal the drug deep into the muscles and prevent permanent staining of the skin.
b. Retract the skin laterally, inject the medication slowly. Hold retraction of skin until the needle is withdrawn
c. Do not massage the site of injection to prevent leakage into the subcutaneous.
Intravenous
- The nurse administers medication intravenously by the following method:
- As mixture within large volumes of IV fluids.
- By
injection of a bolus, or small volume, or medication through an
existing intravenous infusion line or intermittent venous access
(heparin or saline lock)
- By “piggyback” infusion of solution
containing the prescribed medication and a small volume of IV fluid
through an existing IV line.
- Most rapid route of absorption of medications.
- Predictable, therapeutic blood levels of medication can be obtained.
- The route can be used for clients with compromised gastrointestinal function or peripheral circulation.
- Large dose of medications can be administered by this route.
- The nurse must closely observe the client for symptoms of adverse reactions.
- The nurse should double-check the six rights of safe medication.
- If the medication has an antidote, it must be available during administration.
- When administering potent medications, the nurse assesses vital signs before, during and after infusion.
Nursing Interventions in IV Infusion
- Verify the doctor’s order
- Know the type, amount, and indication of IV therapy.
- Practice strict asepsis.
- Inform the client and explain the purpose of IV therapy to alleviate client’s anxiety.
- Prime IV tubing to expel air. This will prevent air embolism.
- Clean the insertion site of IV needle from center to the periphery with alcoholized cotton ball to prevent infection.
- Shave the area of needle insertion if hairy.
- Change the IV tubing every 72 hours. To prevent contamination.
- Change IV needle insertion site every 72 hours to prevent thrombophlebitis.
- Regulate IV every 15-20 minutes. To ensure administration of proper volume of IV fluid as ordered.
- Observe for potential complications.
Types of IV Fluids
- Isotonic solution – has the same concentration as the body fluid
- D5 W
- Na Cl 0.9%
- Plain Ringer’s lactate
- Plain Normosol M
- Hypotonic – has lower concentration than the body fluids.
- Hypertonic – has higher concentration than the body fluids.
Complication of IV Infusion 1.
Infiltration – the needle is out of nein, and fluids accumulate in the subcutaneous tissues.
Assessment:
- Pain, swelling, skin is cold at needle site; pallor of the site, flow rate has decreases or stops.
Nursing Intervention:
- Change the site of needle
- Apply warm compress. This will absorb edema fluids and reduce swelling.
2.
Circulatory Overload - Results from administration of excessive volume of IV fluids.
Assessment:
- Headache
- Flushed skin
- Rapid pulse
- Increase BP
- Weight gain
- Syncope and faintness
- Pulmonary edema
- Increase volume pressure
- SOB (shortness of breath)
- Coughing
- Tachypnea
- Shock
Nursing Interventions:
- Slow infusion to KVO
- Place patient in high fowler’s position. To enhance breathing
- Administer diuretic, bronchodilator as ordered
3.
Drug Overload – the patient receives an excessive amount of fluid containing drugs.
Assessment:
Nursing Intervention:
- Slow infusion to KVO.
- Take vital signs
- Notify physician
4.
Superficial Thrombophlebitis – it is due to o0veruse of a vein, irritating solution or drugs, clot formation, large bore catheters.
Assessment:
- Pain along the course of vein
- Vein may feel hard and cordlike
- Edema and redness at needle insertion site.
- Arm feels warmer than the other arm
Nursing Intervention:
- Change IV site every 72 hours
- Use large veins for irritating fluids.
- Stabilize venipuncture at area of flexion.
- Apply
cold compress immediately to relieve pain and inflammation; later with
warm compress to stimulate circulation and promotion absorption.
- “Do not irrigate the IV because this could push clot into the systemic circulation’
5.
Air Embolism – Air manages to get into the circulatory system; 5 ml of air or more causes air embolism.
Assessment:
- Chest, shoulder, or back pain
- Hypotension
- Dyspnea
- Cyanosis
- Tachycardia
- Increase venous pressure
- Loss of consciousness
Nursing Intervention
- Do not allow IV bottle to “run dry”
- “Prime” IV tubing before starting infusion.
- Turn
patient to left side in the trendelenburg position. To allow air to
rise in the right side of the heart. This prevent pulmonary embolism.
6.
Nerve Damage – may result from tying the arm too tightly to the splint.
Assessment
- Numbness of fingers and hands
Nursing Interventions
- Massage the are and move shoulder through its ROM
- Instruct the patient to open and close hand several times each hour.
- Physical therapy may be required
Note: apply splint with the fingers free to move.
7.
Speed Shock – may result from administration of IV push medication rapidly.
- To avoid speed shock, and possible cardiac arrest, give most IV push medication over 3 to 5 minutes.
General Principles of Parenteral Administration
- Check doctor’s order.
- Check the expiration for medication – drug potency may increase or decrease if outdated.
- Observe
verbal and non-verbal responses toward receiving injection. Injection
can be painful; client may have anxiety, which can increase the pain.
- Practice asepsis to prevent infection. Apply disposable gloves.
- Use appropriate needle size to minimize tissue injury.
- Plot the site of injection properly to prevent hitting nerves, blood vessels, and bones.
- Use separate needles for aspiration and injection of medications to prevent tissue irritation.
- Introduce
air into the vial before aspiration. To create a positive pressure with
in the vial and allow easy withdrawal of the medication.
- Allow a small air bubble (0.2 ml) in the syringe to push the medication that may remain.
- Introduce the needle in quick thrust to lessen discomfort.
- Either spread or pinch muscle when introducing the medication. Depending on the size of the client.
- Minimized discomfort by applying cold compress over the injection site before introduction of medicati0n to numb nerve endings.
- Aspirate before the introduction of medication. To check if blood vessel had been hit.
- Support
the tissue with cotton swabs before withdrawal of needle. To prevent
discomfort of pulling tissues as needle is withdrawn.
- Massage the site of injection to haste absorption.
- Apply pressure at the site for few minutes. To prevent bleeding.
- Evaluate effectiveness of the procedure and make relevant documentation.
http://www.rnpedia.com/home/notes/fundamentals-of-nursing-notes/medication-administration
ENEMA ADMINISTRATION
Definition
The term enema is used to refer to the process of instilling
fluid through the anal sphincter into the rectum and lower
intestine for a therapeutic purpose. An enema administration is
performed using a flexible plastic rectal tube with several large
holes in the tip. This is connected to the tubing from a solution
bag or container. An enema can also be performed using a
prepackaged solution that comes in a soft plastic bottle with a
pre-lubricated rectal tip attached.
Enema solutions are
prepared using plain tap water or saline, soapsuds solutions, oil
solutions, or various medication solutions.
Purpose
The most common purpose for administering an enema is to
stimulate peristalsis (involuntary contraction) and to evacuate
stool from the rectum. A tap water or soapsuds enema dilates the
bowel, stimulates peristalsis, and lubricates the stool to encourge
a bowel movement. These types of enemas are instilled and held for
five to 10 minutes, as tolerated. They are used to treat
constipation, to cleanse the bowel before a bowel exam, and to
cleanse the bowel before bowel surgery. Another type of enema, the
oil retention enema, is prepared in a smaller volume and is
retained in the bowel for 300 minutes. The purpose of the oil
retention enema is to soften the hardened stool and allow normal
elimination. Enemas are also used to deliver medication directly
onto the rectal mucous membranes to be absorbed into the
bloodstream. Steroid enema solutions can be administered to
alleviate bowel inflammation in patients with ulcerative colitis.
Antibiotic enema solutions can be administered to treat localized
bacterial infections. Medicated hypertonic enema solutions can be
used to pull excessive potassium or ammonia from the bloodstream
through the rectal wall. These substances are then eliminated with
the stool.
Precautions
Enemas should not be used as a first-line treatment for
constipation. Frequent use of enemas can lead to fluid overload,
bowel irritation, and loss of muscle tone of the bowel and anal
sphincter. Never deliver more than three consecutive enemas to
treat a patient. A patient with
diarrhea may not be able to
hold an enema. Enema administration must be used with caution in
cardiac patients who have arrhythmias or have had a recent
myocardial infarction. Insertion of the enema tube and
solution can stimulate the vagus nerve which may trigger an
arrhythmia such as bradycardia. Enemas should not be given to
patients with undiagnosed abdominal
pain because the
peristalsis of the bowel can cause an inflamed appendix to rupture.
Enemas should be used cautiously in patients who have had recent
surgery on the rectum, bowel, or prostate gland. If the patient has
rectal bleeding or prolapse of rectal tissue from the rectal
opening, cancel the enema and consult with the physician before
proceeding. Do not force the enema catheter into the rectum against
resistance. This can cause trauma to the rectal tissue. Use only
mild castile soap for soapsuds enemas because other soap
preparations are too harsh and irritate the rectal tissue.
Description
To administer an enema solution, the clinician should have the
patient lie down on the left side, knees bent. Lift the upper
buttock so that the rectal opening can be visualized. Place the
lubricated tip of the enema catheter at the anal opening, and
gently advance the catheter through the anal sphincter into the
rectum toward the umbilicus (navel), 3 in (7.50 cm) for an
adult. Insert the tubing 2 in (5 cm) for a child less than six
years and 1 in (2.5 cm) for an infant. After alerting the patient,
open the enema tubing to allow the solution to flow or squeeze
premixed enema solutions slowly into the rectum. If the patient
complains of cramping, slow or stop the enema flow and have the
patient breathe slowly through the mouth to encourage relaxation.
When giving fluid through an enema bag, start with the bag
suspended from an IV pole at the patient's hip level. As the tubing
is opened, slowly raise the IV pole to promote fluid flow until the
bag is 12 inches (30.5 cm) above the hip for an adult. Continue to
hold the rectal tube in place throughout the procedure or it will
be expelled from the rectum. If the fluid will not flow in, gently
rotate the tubing within the rectum to clear the holes of the
tubing from the wall of the bowel or the impacted stool that may be
occluding the flow. If ordered to give a high enema, slowly raise
the bag no more than 18 inches (46 cm) above the adult patient's
hip (12 inches (30.5 cm) above a child's hip and six inches (15 cm)
above an infant's hip). This will increase the water pressure to
deliver the fluid higher into the bowel. When all of the solution
has been administered, clamp the tubing, remove the enema catheter,
and release the buttock.
Preparation
Before administering an enema, ensure the patient's privacy by
closing the room door. The patient should be encouraged to empty
both bladder and bowels before the procedure. Have the patient
undress completely from the waist down. Position the patient on the
bed on his or her left side with the top knee bent and pulled
slightly upward toward the chin. Place a waterproof pad under the
patient's hips to protect the bedding and drape a sheet over the
patient covering the entire body except the buttocks. Place a
bedpan and toilet paper within quick access. Explain the procedure
to the patient. Emphasize the importance of breathing slowly
through the mouth to encourage relaxation of the rectal sphincter
and to avoid oppositional pressure. Let the patient know that while
he or she may feel the urge to defecate, most enemas need time to
work and he or she should try to hold the fluid for at least five
to 10 minutes after instillation (300 minutes for retention
enemas and longer for some medicated enema solutions). Check the
medication label if it is a medicated solution to avoid medication
errors. Be sure it is the right medicine, the right dose
(strength), the right time, the right person, and the right method.
Verify the expiration date on the label. Do not use outdated
medicine.
Wash hands thoroughly and put on gloves. To prepare for premixed
disposable enema instillations, follow the directions on the
package. Most premixed disposable enemas come with the tip already
lubricated. Shake the solution bottle. Remove the cap from the tip
and expel excess air from the apparatus before use. To prepare
solutions to be administered using an enema bag, heat the solution
to 105°F. Adult solutions are generally 750000cc of solution for
a non-retention enema and 15000cc of fluid for a retention enema.
Children's solutions are 25000cc of solution for a non-retention
enema and 7550cc of solution for a retention enema. Infants'
solutions are 15050cc of solution for a non-retention enema. If
preparing a medicated solution, follow the physician's orders.
Select a rectal tube appropriate
Aftercare
After administering an enema, remain near the patient in case he
or she needs assistance with the bedpan or to get to the bathroom.
Medicated enemas that are expelled immediately may need to be
repeated, using fresh solution. Follow the directions or consult
with the physician. To assist the patient with retaining an enema
after instillation, apply gentle pressure to the rectal opening
using a 4 gauze pad or squeeze the buttocks together. Tuck a 4
gauze pad between the buttocks to collect seepage. This maneuver
may help the patient feel more secure. Cover the patient after the
procedure and instruct him or her to lie still for five to 10
minutes or longer if a medicated solution or retention enema is
administered. This will allow time for the solution to take effect.
Wash items that might be reused, such as non-disposable enema bags
and tubing, in warm soapy water. Rinse and allow them to air dry.
Place disposable items, gauze pads, and gloves in a trash bag, then
seal and discard it. Assist the patient to the bathroom or with the
bedpan after he or she has held the enema solution for the correct
amount of time. Hands should be washed after performing the
procedure. Note the results of the enema.
Complications
Complications of enema administration are not common but can
include irritation, swelling, redness, bleeding, or prolapse of the
rectal tissue. If any of these symptoms are apparent, or if the
patient complains of pain or burning during enema instillation,
stop the procedure and notify the physician.
Results
Most enemas, because of their liquid state, are absorbed quickly
and work rapidly. Retention enemas will take 300 minutes to
achieve full therapeutic effect. Cleansing enemas usually work
within 105 minutes to cleanse the bowel and relieve constipation.
They may, however, need to be repeated one or two times to
thoroughly cleanse the bowel in preparation for a bowel exam or
bowel surgery. Medicated enemas, such as antibiotic or
anti-inflammatory solutions, may need to be repeated daily over a
period of a week or more for full therapeutic effect.
References
http://www.enotes.com/enema-administration-reference/enema-administration


